I was asked from Rick St. Dennis Tuto Blog to do a color tuto as guest designer!
Oh - a great honor!
They want me to show you the color technique with the black outlines.
Ok - let´s start!
First of all you need an image from Rick St. Dennis! ;-)
More needs: a very smooth and even paper and colored crayons (a must is a black and a white one and if you color skin then a flesh tone too), a small brush
It´s not important to have expensive art pencils. When I tried out this technique I started with crayons for kids.
Now I do this with Caran dÁche Pablos. But I mix it with others too - like the flesh tones.
I´m working step by step and between I use the brush to take away the dust that it will not smear the white paper.
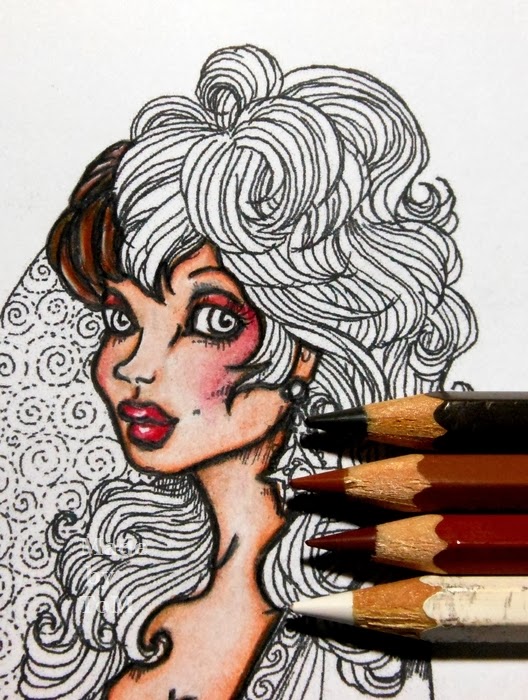
With the black pencil I start the face. I do all the printed lines. Here on the pic you could not see very well.

For the skin I use 5 colors.
A brown, a redbrown, a apricot and 2 flesh tones.

I always start with the darkest tone.
With the brown I go over the lines witch I did with the black one. Then the redbrown over the lines I did before and a little bit more as you can see on the pic.

Next is the apricot to color more skin - don´t forget to go over the colored lines you did before.
Looks spooky doesn´t it? LOL

Then I use a flesh tone to fill the white areas and blend to the other colors.

For the lips and the rouge/blusher I use a red this time. The cheeks are colored very lightly with the red and blended again with the flesh tone. (cheeks is the most difficult part for me*gg*) If you want highlights on the lips you have to leave small areas white.

And then I go over all black lines with the black pencil again.

First part is done. Now she doesn´t look scary anymore does she??
I´m working step by step the whole image. Everytime start and finish with the black outline.The colored areas starting with the darkest color tone. And don´t forget to take off the dust with the brush!
Next part - the rest of the skin

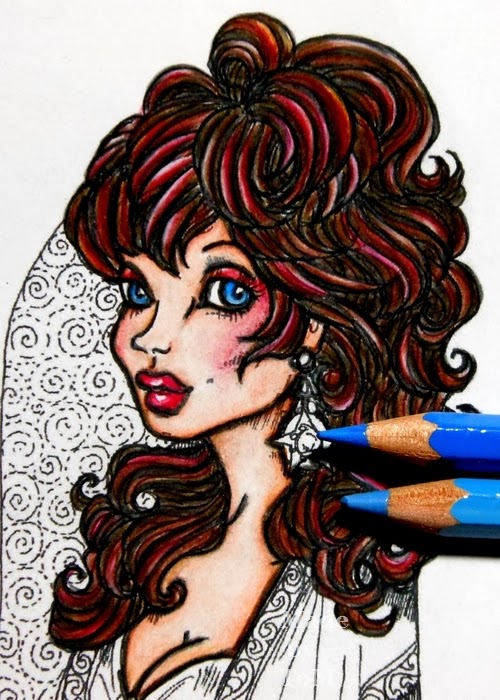
Now the hair
Here I use 3 different browns, a red and a white. It´s not necessary to use 3 tones but 2 will be fine.
Is start again with a part doing the black outlines.

To fill in start again with the darkrest tone. Go over all with the next tone and leave a very small part uncolored. Over this you go with your white and blend it and it will look like highlights.
Do now the hair step by step like this. I mixed the red in too.


For the eyes same again
black, 2 blue tones and black again
For the dress I use greens - same technique


For the jewels and the border I used a yellow and and orange tone


For the background I use 2 blue tones again

And finally FINISHED!
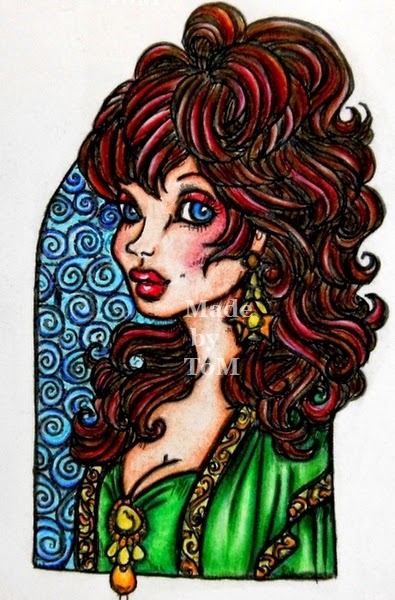
When it´s finished I use a hair lacquer to "fix it". The sureface of the colored motif get´s totally plain. You can not see any pencil stroke and it looks like printed on a highclass paper. Don´t ask my why - I don´t know!
I hope you like my turorial and you will try it out!
And don´t desperate no one is born master. It´s all exercise and practice.
Hugs

9 Kommentare:
Ein tolles TUT !!! und du hast wie immer recht
"Übung macht den Meister"
aber auch "wer nicht waagt der nicht ..."
Also in diesem Sinne
LG hellerlittle
Hi Tom
Thanks for the wonderful tutorial on our Tuts and Comments blog
Thanks very much for sharing this gorgeous technique
Love
Mo
Rsd Edt
Wow...besonders deine Haar-Coloration finde ich wirlich spitzenmäßig! Tolles Tuturial lieber Tom!
Liebe Grüße
Martina
a wonderful tut and technique xxx
Das schaut sensationell gut aus! Vielen Dank für die Anleitung.
Liebe Grüße Simone
this is absolutely amazing. I love the step by step instructions. thx for sharing
Fabulous tut Tom.Thank you for the step by step.
Please water mark your gorgeous finished image before it is stolen!
Sue x
WOW Right on track my friend, thanks ever so much for this...I am just starting to use my pencils now so this is awesxome.xxxx
wow-what gorgeous color work Tom. This is such a beautiful image and what a fantastic tutorial full of great instruction. Thank you for inspiring me to want to color (not my fave thing at all), but you've made it look easy.
Kommentar veröffentlichen